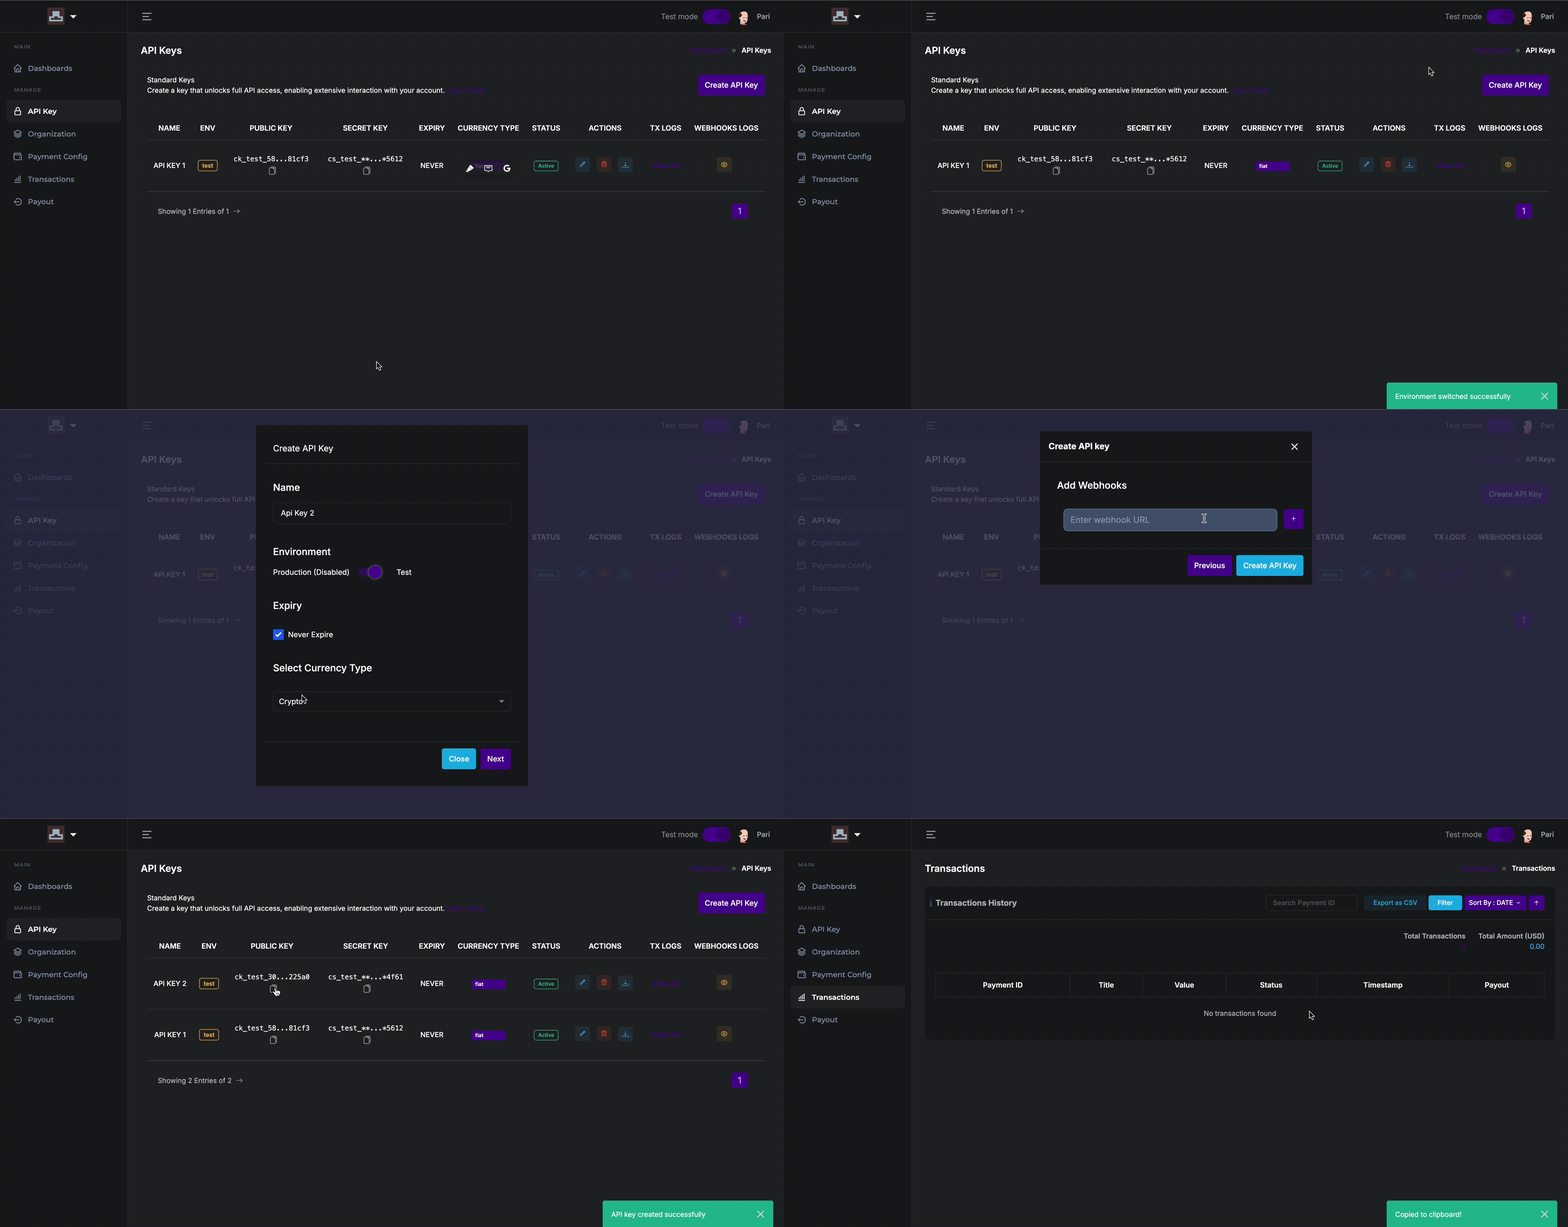
API Key Generation
1. Overview
An API key is a unique identifier that allows you to interact with the platform's API. Once an API key is created, you can use it to:
- Authenticate your API requests.
- Access platform services like transactions, data queries, and more.
The platform provides two types of environments for API keys:
- Test Mode: For testing and debugging.
- Production Mode: For live operations in the production environment.
2. Prerequisites
Before generating an API key, ensure the following:
- You have access to your platform account.
- You understand whether the API key will be used for testing or production.
- Webhooks (if applicable) are properly set up to receive event notifications.
3. Generating an API Key

Step-by-Step Instructions
-
Login to Your Account: Navigate to the platform's dashboard and ensure you are logged in.
-
Access API Key Section:
- From the main menu, click on API Keys.
- The API Keys page displays options to manage and create new keys.
-
Click 'Create API Key':
- Locate the Create API Key button and click on it to initiate the process.
Environment Settings
- Select the Environment:
- Toggle between Test Mode and Production Mode. Note that production mode might be disabled until additional configurations are complete.
- Test Mode: Use this environment for non-production purposes, such as testing and development.
- Production Mode: Once selected, this key can be used for live transactions and interactions with the platform.
Expiration Settings
- Set API Key Expiry:
- Check the box for Never Expire if you want the API key to remain active indefinitely.
- If unchecked, configure an expiry date based on your operational needs.
Currency Type
-
Select Currency Type:
- Choose between Fiat or Crypto, depending on the type of transactions or data you intend to manage.
-
Click 'Next':
- Once all details are filled, click the Next button to proceed.
4. Managing Webhooks
Webhooks allow the platform to notify your system of specific events such as transaction completions, balance changes, or other updates.
Steps for Adding Webhooks:
- After the API key is created, you can configure Webhooks from the Webhooks section.
- Provide the endpoint URL where the platform should send event notifications.
- Select the event types that you want to be notified about.
- Save your webhook settings.
5. Using the API Key
After creating the API key, you will receive:
- Public Key: A unique identifier for API requests. This key is used when sending requests to the platform.
- Secret Key: Used to sign requests and authenticate transactions securely. Keep this key private and never expose it publicly.
Public and Secret Key
- The Public Key is included in your API requests as an identifier.
- The Secret Key is used to sign requests, ensuring authenticity and security.
Security Best Practices
- Never share your Secret Key: Treat the secret key as a password; avoid exposing it in publicly accessible files or code.
- Use HTTPS: Always ensure that your API requests are sent over a secure connection.
- Rotate Keys Regularly: For enhanced security, periodically rotate your API keys and update your integrations accordingly.
6. Logs and Key Management
View and Manage Logs:
- Transaction Logs: After an API key is generated, you can track all API interactions in the Transaction Logs section. This includes successful requests, errors, and other relevant data.
- Webhook Logs: Any event triggered by the platform through a webhook will be recorded in the Webhook Logs.
Edit or Delete API Keys:
From the API Keys section, you can edit existing keys or delete them if no longer in use. Always ensure proper key management to maintain the security of your integration.